
for Windows
by Kai Schreiber
- You write your documents in LaTeX/BibTeX, and mainly work in a Windows environment
- You want to manage your paper collection but don't want to or can't use Endnote
- You collect software with silly acronymical names
- You are willing to use noncommercial software with no official support and no guarantees whatsoever, that has not been tested extensively on many different systems (but has been in use by one person for a long time on a few different systems)
- Edit and maintain BibTeX reference libraries for use with LaTeX
- Keep track of where items in the library are either physically or as files
- Allow flexible categorizing of items in the library
- Semi-automatically download new paper references from Medline/PubMed and import their abstract
- Keep abstracts and/or notes for each item in the library
- Work with databases other than Medline/PubMed
- Work with word processing programs to create reference lists
- Clean up your filthy desk while you're gone for lunch
- Repel the forces of evil
I wrote BiBLE because I could not find a program that allowed me to edit my BibTeX reference file in Windows, and also to keep my growing paper collection organized. Since most of the new references I added after the first version was working came from the Medline database, I wrote a Medline import filter. And since I downloaded pdfs rather than xeroxing or printing papers them, I added the functionality for maintaing a digital library.
I wrote BiBLE for my personal use. You are free to download and use it for your sinister purposes. Be aware however that there is no support, and while I probably will fix bugs and problems that are brought to my attention, there is just now telling how long it might take. As for new features, feel free to request. I might build it in some time.
Whatever your problem or idea, though, before you contact me, make sure you have carefully read this page and are not asking something that is explained here or for a feature already included in the latest release of BiBLE.
To install, just open the zip archive, extract the contents to a folder of your choice and double click bible.exe. Have fun.
If you feed BiBLE an existing BibTeX database, be warned: the first time you save it, it will be saved in BiBLE's own format. If there are no bugs (and there are none that I am aware of), this should contain exactly the same information as the original library did.
In the case of bugs, all bets are off. If you do nonstandard things in your BibTeX library, I suggest you try BiBLE first on a backup copy and compare the version BiBLE saved with your original. Let me know if there is any discrepancies.
The BiBLE Manual
0 Basics
BiBLE consists of the main executable bible.exe and the ini file bible.ini. BiBLE will not start without the ini file. BiBLE reads and writes libraries in the BibTeX library format. If you don't know what BibTeX is, there is a good chance that BiBLE is not for you, although you could still use it to archive your pdfs. But I'd strongly recommend you use Endnote instead.
1 The Main Library
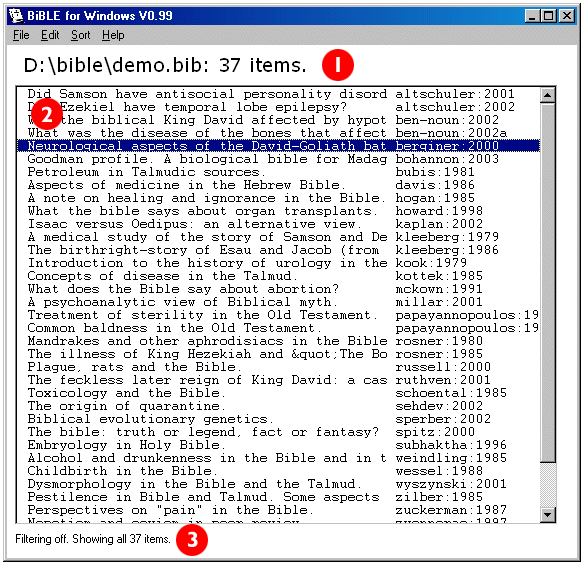
This is BiBLE's main window, with the current libraries path, filename and reference count (1), the list of references (2) and the status line (3).
When you click on an item in the Main Library, the display window automatically opens up if it's not open already and displays the data for this reference. If the option is activated, the notes window also is shown.
1.1 The Menus
Using the menubar at the top of the Main Library, you can access four submenus:
- The File-Menu
- New Library
- Close the current library and open an empty one.
- Load Library (CTRL-L)
- Load a .bib library file.
- Save Library (CTRL-S)
- Save the .bib file under the same name and path you loaded it from. Note that when you save a file BiBLE also saves the notes for this file in a file with extension .not in the same directory.
- Save Library As
- Save the .bib file under a custom name.
- Import
- For the importing functionality of BiBLE see the separate section further down.
- Export
- Using Export to HTML you can write selected fields for the currently displayed items to an HTML file. You can
select what fields to export and into how many columns the output should be formatted and whether individual items should be
separated by a blank line. Note that the reference field and the reference type are always exported.
Export to Clipboard (CTRL-ALT-C) exports the currently selected item to the clipboard, using the apropriate formatting for the type of reference.
- Exit (CTRL-X)
- Use this to exit.
- The Edit-Menu
- Delete Item (SHIFT-DEL)
- This will delete a reference from the library. There is no undo in BiBLE, so you have to confirm before it's actually done.
- New Item (INS)
- Use this to insert a new blank item. You'll then have to enter the fields manually in the display window.
- Add Custom Field (SHIFT-INS)
- Adds a custom field to the currently selected item. This will bring up a dialog where you can enter the fieldname and initial value. The dialog will have the values used last already entered. The new field will immediately show up in the display window.
- Add Keywords (CTRL-K)
- This will do the same as insert custom field, except that the fieldname 'key' will already have been entered and the value field will be blanked.
- Check Consistency
- This will check the library for reference doubles, empty necessary and double filled exclusive fields and write the findings into the log. The overall result is displayed in the status line.
- View Log
- This displays BiBLE's log.
- Options (CTRL-O)
- This will bring up the Options menu. See the section below.
- The Sort-Menu
- by Title
- Sorts by the title field.
- by Author
- Sorts by the autor field.
- by Year
- Sorts by the year field.
- by Journal
- Sorts by the journal field.
- by Type
- Sorts by the type field.
- by Reference
- Sorts by the reference string.
- Filter
- This is a shortcut for activating or deactivating filtering. For full access to filtering see the options section below.
- The Help-Menu
- Contents
- Displays a windows help file that is fairly outdated and mainly of historical interest.
- About
- Displays a small window with my email address and the URL for this document.
Selecting a inactive sorting option will turn sorting to this key, selecting the active option will turn sorting off.
2 The Display Window
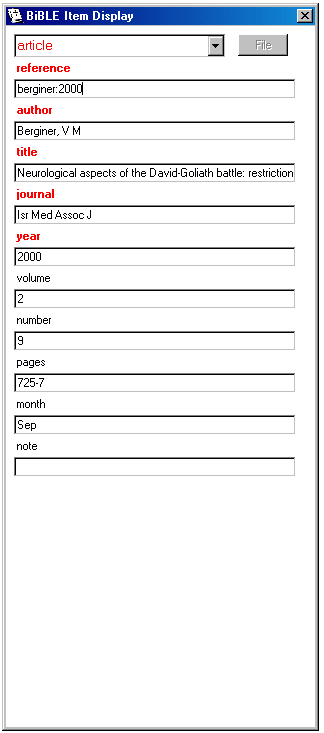
This window displays the fields for the reference item selected in the Main Library Window.
At the top is the selector for the itemtype. This can not be entered as a string but only be selected from a preset list of items. Each of these items has an associated field structure. Both the list of item types and the field structure can be modified by editing the file bible.ini with a text editor.
To the right of the itemtype selector is the file button. If a file is present in your document path that has the reference string of the current reference (without the colon) as its filename, this button will be activated. A file called berginer2000.pdf would have to be present in the pdf folder for this to work for the selected reference. Additionally, the display window will have a gray background and a star will appear in front of the items line in the Main Library window. By pressing the file button you can then open the associated file in its viewer.
For every itemtype there are four different field types: required, optional, custom and exclusive fields. The different field types are color coded in the display window. For any type of reference, BiBLE will automatically display field boxes for all required and optional fields, and add boxes for any custom field that the current item contains.
- Required fields (bold red)
- A required field needs to have a value set for BibTeX to be able to process the item correctly.
- Optional fields (black)
- An optional field may or may not appear in the formatted bibliography, depending on the style you choose, and does not need to contain a value for BibTeX to accept it.
- Custom fields (blue)
- Custom fields are not recognized by standard BibTeX installations and will usually be ignored by it, though it is of course possible to write BibTeX styles that use them. They are useful in BiBLE to store additional information about items. This can be the physical place an item is stored in, for instance, or keywords. Custom fields can be added to an item by selecting Add Custom Field from the Edit Menu. To delete a custom field, just delete it's value. It will then disappear.
- Exclusive fields
- Exclusive fields can be any two fields in an item that may not be set at the same time. An example is the autor and editor fields for the book itemtype. If one of these fields is set, the heading for the other will turn italic. If both are set, the values will turn red to indicate the conflict.
If you want to add your own itemtypes or change the field structure of BibTeX's standard ones, you can do so in bible.ini.
The section [BibTeX entry specification] contains a item named types, which just lists the possible itemtypes in a comma separated list. A second line then lists all the fields. This is followed by one line coding the field structure for each of the itemtypes. Finally there is a item named choice which lists all the exclusive fields.
To add a new itemtype, add it to the end of the items list and the create a line noting its field structure. Suppose, for example, we want to create an item called "scrolls". This itemtype should have the required fields author and title and the optional fields year, pages, cave and dig (for the place the scroll was discovered in). Cave and dig should be mutually exclusive.
First we add "scroll" to the line of items and the new fields "cave" and "dig" to the line of fields.
Then we create the itemtype by adding the line scroll=2,1,16,12,19,21,22
The first number in that line denotes the number of required fields following it, the rest of the numbers are the indices into the line listing the fields, starting with zero. The second item (with index 1) in that line is "author", the 17th (index 16) is "title". Items 12, 19, 21 and 22 are "pages", "year" and the newly added cave and dig respectively.
We then add scroll,22,23 to the end of the "choice=" line, coding the exclusivity of the two fields. There, we've done it.
Note that you can't have more than two fields being exclusive. Note also that you never should enter an new field in the middle of the "field="-line, since that would screw up the field structure for all itemtypes.
For easy access, here's the field numbers for the predefined fields. You will also need these to specify the format for the clipboard export feature.
| 0 | address | 1 | author |
| 2 | booktitle | 3 | chapter |
| 4 | editor | 5 | howpublished |
| 6 | institution | 7 | journal |
| 8 | note | 9 | number |
| 10 | month | 11 | organization |
| 12 | pages | 13 | publisher |
| 14 | school | 15 | series |
| 16 | title | 17 | type |
| 18 | volume | 19 | year |
| 20 | edition |
3 Options
Any change made in the options menu is immediately reflected in bible.ini. There is no cancel button for changes here. If you made a change, you'll have to undo it the way you did it. You get the picture.
There are five tabs in the options dialog, each devoted to a different theme.
3.1 Filter Options
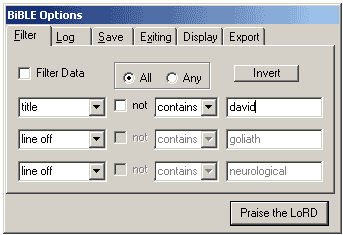
This tab allows you to set and activate a filter used for the display in the Main Library Window. Only items that pass the filtering rules set here will be displayed when the filter is active.
The checkbox in the top left corner will activate the filter. Each of the three lines can be set to filtering one of the fields present in your library. Note that this includes custom fields and notes. You can filter these fields by using the contains, equals or lesser or greater than operators. All operators can be inverted, adding doesn't contain, is not equal, greater than or equal and lesser than or equal to the repertoire. The three lines can be combined with AND or OR (using the radio buttons on top).
The invert button can be used to quickly invert the whole filter.
The filter can also be quickly switched on and off from the sorting menu in the Main Library window.
3.2 Log Options
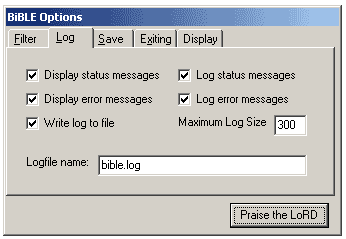
This tab allows you to select which messages you want to receive in the Main Library window's status line and which should be written to the log. You can also specify that the log should be written to a file on exit and reloaded in the next session. Old items will be removed from the log when it reaches the specified maximum length.
You can clean the logfile from the log display dialog accessible through the main menu.
3.3 Save Options
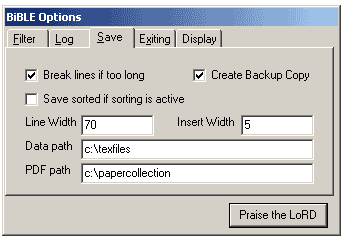
These determine the behaviour of BiBLE upon the saving of the library. Long field contents can be broken into shorter lines at the cutoff supplied by the line width field. The insert width determines the number of spaces the broken lines are inserted by.
You can save the library in the order it was loaded in, or in the order it is currently displayed in using the checkbox. If you use the same sort key most of the time, you can speed up the display considerably by saving the library sorted. On the other hand you'll lose information about the order items were entered. Your call.
The data path is the path where your library is stored and where .not files will be written to. The pdf path is the path to your electornic document collection. Currently only ps and pdf directly stored in the folder specified here are indexed. Subfolders are ignored.
3.4 Exit Options
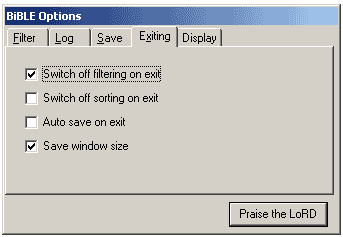
These options determine BiBLE's behaviour at the end of times. You can make it switch off filtering on exit (otherwise items will be filtered when you next open it), switch off sorting on exit (same logic), make it automatically save the library on exit and automatically save the three main windows size and location on the desktop.
Even if you do not autosave the library, BiBLE will warn you upon exit if your current library contains unsaved information.
3.5 Display Options
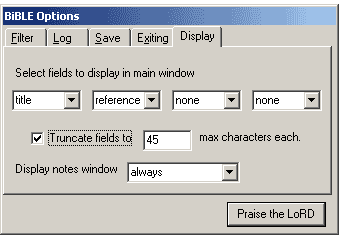
These options determine the way the information in BiBLE's main library window is displayed. You can select up to four fields to display, select the width of each column or choose to display each in full length (not recommended). Here you can also determine whether the notes window should be always visible, only when there is something in it or never.
You can always bring up the notes window by pressing CTRL-N or selecting the menu item from the edit section of the main menu.
3.6 Export Options
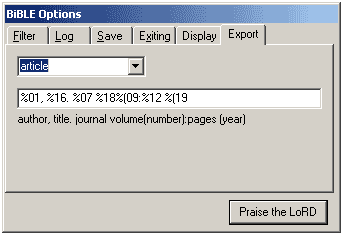
These options specify how BiBLE exports reference items to the clipboard. While I recommend using your BiBLE database with LaTeX documents, BiBLE allows you to insert references into your favourite word processing application. Entries will be formatted using type specific format strings that you can adjust using this tab.
Just select the type you want to change at the top and then enter or change the format string. Any occurence of %xx in the format string, where xx is a two digit number, will be replaced by the value of the field with that number. To simplify the design of the format string, entered field numbers are automatically converted into the field name below the box.
To get brackets around the field value, use %(xx instead. Using %( will suppress the brackets if the field is empty.
I don't really use this function, so there is no standard export strings for any item types except article and book.
4 Notes
You can keep notes for each of the references. Notes are restricted to a single line of text, so they can contain no line breaks. Notes are kept in a file separate from the library file with the extension .not.
When importing from Medline/PubMed, the abstract of a paper will automatically be entered as a note, if available (See next section).
5 Importing
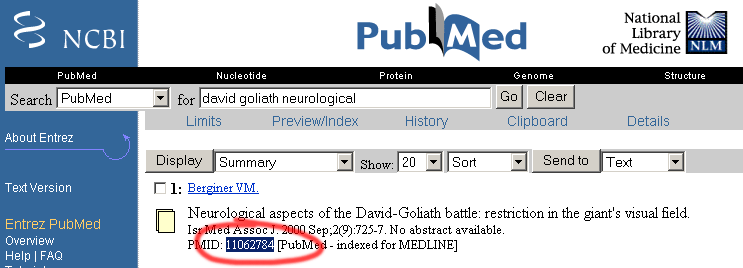
BiBLE allows you to import items using the Medline reference library provided online as PubMed by the National Center for Biotechnology Information. When you do a search using PubMed, you will be returned a short record of found items containing the PubMed ID toward the bottom. Mark this ID and copy it to the clipboard using CTRL-C.
If you now go back to BiBLE and press CTRL-I or use the import feature in the main menu's file section, BiBLE will automatically retrieve the record from PubMed and import it into the library. If there is an abstract available, it will be imported into the notes field.
Alternatively, for importing multiple items, you can activate BiBLE's clipboard watching feature. Whenever you copy a new PubMed ID to the clipboard, BiBLE will automatically add the reference information to the library. When you activate clipboard watching, BiBLE turns off any sorting, so that all imported items appear at the bottom of the library screen. This allows for easy review of imported items. Sorting will be automatically switched back on when you turn clipboard watching off again.
Upon importing, new references will be labeled using the last name of the first author and the year of publication, separated by a colon. Should another item already use this reference string, a lowercase letter will be added after the year.
6 Using Keys
BiBLE has some built in functionality for organizing your reference library. If you add a custom field named key to your references, BiBLE will upon loading of the library automatically collect all the words appearing in any key field into a list. This list will be accessible by right click from boxes where keys should be entered, namely the field value box on the dialog for adding custom fields, the box for filter values on the filter tab of the options dialog and on the key field in the display window.
Note that the key popup menu is created upon loading of the library and does not reflect changes made until you save and load the current library or close and reopen BiBLE.
7 FAQ
Will there be a Linux version of BiBLE?
I sure would like to create one. But since I've never ported anything nor coded anything for Linux before, there is no saying when that might happen. If anybody has advice on how to get something from Delphi to Kylix quickly, I'd appreciate it.
How can I merge two libraries?
From within BiBLE, you can't. But you can merge them manually using any text editor. Just copy one of them onto the end of the other.
Can I filter items using wildcards/regular expressions?
No, you can't. Sorry. Maybe later.
Why is the version number 0.99?
To make BiBLE look cheaper. Also, because it has not been tested yet on different systems and with different databases. Once I'm content that there are no nasty bugs hiding in the code, I'll increase the version number to something more rounded.
Why is the i in BiBLE spelled in lowercase?
It looks TeXyEr that way.
Who is the "LoRD"?
I don't know. You tell me.
Last changed on Oct 23 2003